SimplyVX Management Interface (SMI) - Client Manual
Formerly Communications Web Interface (CWP)
- SimplyChat
- SimplyGuest
- SimplyNotify
- SimplyPMS
- SimplyRate
- SimplyReport
- SimplyRun
- SimplySupport
- SimplyVX
- SimplyWake
SimplyChat
Texting module which allows users to chat internally or text with external parties using SMS
Overview & Usage
Overview
The SimplyChat module allows you to send SMS text messages to phone numbers with SMS capabilities. A user must be assigned to a chat group, or a SMS DID assigned to them.
To start an SMS chat, log into the Client Web Portal (https://cwp.thinksimplicity.com). Once logged in click on SimplyChat on the left hand menu. Then choose Chat. You will be greeted with a screen with a text field similar to a chatroom or SMS phone-app screen.
SimplyChat Limitations
- 1000 character limit when creating messages in chat window
Terms:
- DID: Direct Inward Dialing - A term meaning, for simplicity's sake, a telephone number. For example, a DID of 406-555-5555 would be a DID (direct inward dialing) for a cell phone, business, desk phone, etc.
Types of Conversations
- External: A DID/SMS for non-guest at the hotel (visitors)
- Guest: A DID/SMS for guest at the hotel (check-ins)
- UI Users: Other users of the Client Web Portal/SimplyChat, such as other Front Desk employees, managers of the hotel, etc
- Groups: A grouping of users where a message can be sent to all members in that group.
Filtering SMS Conversations

- Unread Conversations - Filters and shows all unread conversations for the user
- All Conversations - Filters and shows all the existing conversations for a user
- Favorite Conversations - Filters and shows only favorited conversations for a user. Favorites allow for quick reference and navigation of often used, or currently being used conversations.
- External Conversations - Filters and shows only External type conversations
- Guest Conversations - Filters and shows only Guest type conversations
- UI Users Conversations - Filters and shows only UI Users type conversations
- Group Conversations - Filters and shows only Group type conversations
- Search Conversations - Allows a users to search conversations by Room, Staff or Group
Starting an SMS Conversation

- You can start a new SMS Conversation by selecting the New Chat button as seen in the image above
Types of New Conversations:

- Existing Contact Chat: Starts a new SMS conversation with a SimplyChat User/Contact
- New Mobile Chat: Starts a new SMS conversation where you enter a DID (mobile number) not previously used
- Create Chat Group: Starts a new group conversation with participants in a group.
New Mobile
Starts a new conversation where you enter a new DID/SMS number that has not been previously used before.
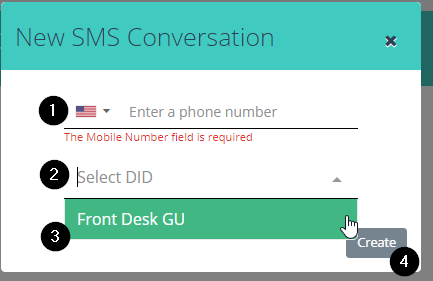
- Enter the recipient's DID/SMS number you wish to communicate with (cell phone number)
- Select the DID you wish to use to communicate. The recipient will see this telephone number when the text message is sent, and will be replying to this telephone number.
- DIDs to send messages from can be assigned to individuals or groups. Such a a "Front Desk" Group where everyone in that group will be using the same DID to send messages.
- Click Create to start the conversation with the entered recipient phone number & selected DID
Existing Contact
- Starts a new conversation with previously used contact. You can select a contact to resume a conversation or start a new one with a previously saved contact.

- Select Pick Up to take over the conversation from another user and begin conversing. (circle 1 in picture below)

Create Chat Group
This option allows you to create a new Group Conversation with only the selected users you wish to be in the group.

- Enter a name for the Group Conversation
- Click the arrow to choose your Group Conversation participants

The Conversation Screen

- Favorite: Favorites the conversation for an easy reference using the Favorites Filter
- Contact Info: Shows relevant information for the contact in the conversation such as name, email, phone number, reservations or other contact info.
- Received Messages: Replies to you, the user, will be in dark green
- Sent Messages: Messages sent to the contact twill be light gray
- Emoji: List of emojis that can be sent in the conversation
- Message Templates: Shortcut to the canned responses, or message templates, that allow for quick responses to common questions or responses.
- Send Button: Sens message written above to the recipient.
Chatting Party Types
Messaging Method Capability Matrix
The below tables shows which parties can communicate and available methods. Across the top are the senders who initiate a message and along the left are the receivers of the message.
There are 2 possible method of communications:
Web - users will be able to communicate using the online SimplyChat chat interface
SMS - users will be able to communicate using their SMS capable devices
Web2Web = A message is sent from the online SimplyChat chat interface and received by the party within their online SimplyChat chat interface
Web2SMS = A message is sent from the online SimplyChat chat interface and received by the parties SMS capable device
SMS2SMS = A message is sent from a SMS capable device and received by a SMS capable device
SMS2Web = A message is sent from a SMS capable device and received within the the online SimplyChat chat interface
|
|
Message Senders |
|||||||
|---|---|---|---|---|---|---|---|---|
|
Message Receivers |
|
UIU | UIUD | UIUDM | GU | GC | MV | MG |
| UIU | Web2Web |
Web2Web |
Web2Web | Web2Web* | ||||
| UIUD |
Web2Web Web2SMS |
Web2Web Web2SMS SMS2Web SMS2SMS |
Web2Web |
Web2Web* |
SMS2Web SMS2SMS |
SMS2Web SMS2SMS |
||
| UIUDM | Web2Web | Web2Web |
Web2Web |
Web2Web* | ||||
| GU | Web2Web | Web2Web | Web2Web | SMS2Web | SMS2Web | |||
| GC | Web2Web | |||||||
| MV |
Web2SMS SMS2SMS |
Web2SMS* | ||||||
| MG |
Web2SMS SMS2SMS |
Web2SMS* | ||||||
Web2Web* = User can only reply to a conversation originated by another party
Web2SMS* = User can only reply to a conversation originated by another party
Definitions of User Types / Parties
UIU = Online Web Chat User
UIUD = Online Web Chat User with direct SMS number to receive messages from external SMS capable devices.
UIUDM = Online Web Chat User with mobile number to receive notifications. (Not for 2 way communication).
GU = Group User part of an inbound SMS group. All group members will receive SMS messages when sent from external SMS devices to dedicated inbound SMS number (DID).
GC = Group Chat between UIU(D)(M) for internal conversations. No external SMS messages will be sent or received. No SMS number can be assigned to Group Chats.
MV = Visitor, External SMS device not associated to a room.
MG = Guest, External SMS device associated with a checked in room.
Chat Groups
Overview
Chat Groups are used for adding users of the CWP to a group, not SMS DIDs
Chat groups allow you to add multiple participants to a conversation. Any messages you send will be sent to all recipients you choose to make a group with.
Creating A Group
- Click the Create New button
- Name the group and click Submit
Add Users To A Group
- Find the group in the list of groups and click the Action button
- Select the View button
- In the list of users, click Attach User to the users you wish to add to this chat group.
- Once the Attach button is pressed, the user is added to the group. To go to the previous screen click the Back button
Remove Users From A Group
- Find the group you wish to remove users from in the list under Chat Groups
- Click the Action button and select View
- In the list of users, click the Remove User button to remove a user from the group
Chat With A Group


- Click Chat in the left hand menu
- Click the New Chat sign on the page that loads
- Select Existing Contact to bring up a list of contacts
- Select the Group you wish to add. In the image below, the multiple person icon indicates a group (ex. Front Desk)
Broadcast Message
Overview
Broadcast message allows you to send a message to several contacts at once despite if they're in a group or not. Unlike group chat, the broadcast messages goes to the individual only, and their replies are not seen by anyone else besides the SimplyChat user(s).
Create a Broadcast Message
- Click "Create Broadcast Message" in the upper right hand corner of the screen

- Broadcast For: Filter contacts between Staff, Guest, External or Contact List
- Select: Check the checkbox to the contact(s) you wish to have the message broadcast to
- Broadcast Message: Type the message you wish to broadcast into this field
- Message Template: You can also select a pre-made template to auto fill the Broadcast Message field
- Send: Send the message
Continuing the Conversation
You can view broadcast messages, and continue the conversation with that individual contact by going back to the Chat module by click on "Chat" located in the left hand menu
Delete Broadcast Message
You can delete the "Broadcast Message" by clicking on "Action" and then "Delete"
Note: Deleting the Broadcast Message" does not un-send the message.
Message Template
Overview
Message Templates allow you to create commonly used messages that can easily be selected to save time sending messages to others.
Create New Message Template
- To create a new message template, click on the "Create New" button in the upper right hand corner of the page.
- Name your template in the Title field
- Key: the placeholder used to call the "shortcode"
- Type the message you wish to make a template out of in the Message field
- Check the Enable checkbox to make the message template available for use
- Click the Create button to save the message template
Shortcodes

Shortcodes (merge fields) allow you to use placeholders that will update with the relevant information automatically when sent. For example @@firstname@@ will be replaced automatically with the guest's first name, or @@room_number@@ will be replaced with the room number automatically, etc. This allows you to create personal and relevant message templates.
SMS DIDs
Overview
SMS DIDs are the list of telephone numbers the SimplyChat module for your hotel can use. You can assign DIDs (telephone numbers) to specific users or groups (note: you can't assign to specific users and group(s) at the same time).
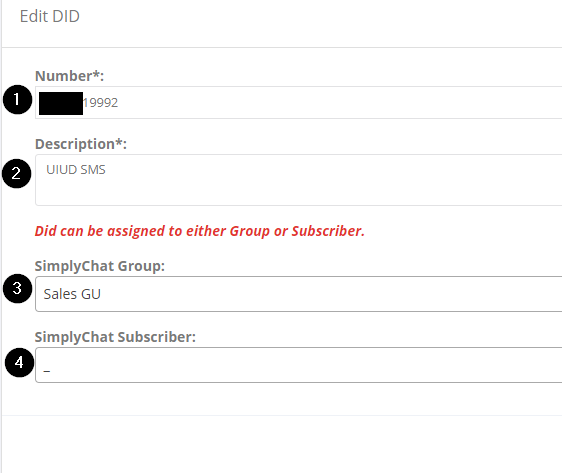
- The DID (telephone number) being modified
- Description allows you to briefly describe the DID
- SimplyChat Group: drop down lets you select the group you wish to assign the DID to
- SimplyChat Subscriber: drop down lets you select the single user to assign the DID to
You can either use SimplyChat Group or SimplyChat Subscriber you cannot use both
SimplyGuest
Used to view, manage and modify Guest Room extensions in the hotel.
Collection of tools to manage and view guest details
My Address Book

Under My Address Book you can store contacts to your Personal Address Book. Here all the contacts you add will be visible to your whole organization under Guestbook. But only the contacts you add will be under My Address Book.
Create a New Contact
To create a new contact, click Create New
External Record - Optional - (# is pulled from our system for imported external contacts)
First Name - Contacts first name
Last Name - Contacts last name
Birthday - Contracts birthday
Phone Numbers - Contacts phone number, can categorize by Location & Tech type
Emails - Contact's email, can choose personal or business
Address - Contact's address, can choose home or office
To Default List / To Specific List - You can choose to add this contact to your Default List or choose an already created Specific List.
Entries will look like the image below.

SimplyNotify
Collection of settings to manage the automated notification messages within the SMI
Overview
The SimplyNotify module allows you to setup notifications, such as missed wakeup calls, for the hotel.

- Create New - Create new notification alert
- Currently set notification modules
- Notifications Enable - Indicates if notification module is enabled or not
- Actions - Action allows you to modify, view or delete a notification
Create New Notification

- Name: Name the notification operator
- Module: Select the module you wish to send notifications from
- Notification URL: Url (webhook?) to ping with notification
- Enabled: enable or disable the notifiaction operator
Modify Notification

- Click on "Action" then "Edit" to modify a Notifciation Operator
- Click on "Submit" after modifying to save changes.
Add Notification Recipients

To add notication recepients click on the "SimplyNotifty" link on the left of thep age, then click "Notification Recipient"
- Create New: Creates new notification recipient
- List of currently created recipients.
- Action: Button gives you options to modify, delete or view recipient entry

- Module Operator: Choose the module the recipient will receive notifications from
- Notification Type: Select whether User, group or all will receive this notification type
- Recipient: choose who will get the notification on their page when they log into the Client Web Portal
- Recipient: Select yet another recipient to receive notifications
- Priority: Mark the notifications from this notification operator as Urgent, Important or Normal
- ?
- Enabled: Choose whether this notification will be enabled or not
SimplyPMS
Collection of PMS (Property Management System) settings and information
From PMS System
Used to view records sent from the PMS Vendor to the hotel PBX system.

- ID: PMS Record ID
- Record: Record sent (ie. check in, out or maid codes status)
- Reference: PBX PMS Interface reference number
- Date: Date and time the record was sent
- Account: Think Simplicity account number
SimplyRate
Collection of call accounting settings and details
This module is to view the calling rate/transactions for phone calls
SimplyReport
Collection of reporting tools throughout the system
Call Report
SimplyRun
Automate actions based on event triggers within specific modules
Overview
SimplyRun is a module which will perform automated tasks based on time or other specific triggers.
How the Rules are Executed
A lambda function will run every minute and access a URL using a GET method to https://cwp.thinksimplicity.com/api/run/cron
This will trigger the master controller file for SimplyRun and function named 'public function run()'
SimplySupport
Initiate or manage support assistance from Think Simplicity
Create Support Ticket
Overview
SimplySupport allows you to submit a support ticket to support@thinksimplicity.com via the CWP intead of your inbox.
Create Ticket

- Title: Title of the ticket you wish to submit
- Category: Choose the most releveant category so support can better assist
- Email: Valid email, electronic communication regarding this ticket will be sent to this email
- Contact Person: name of the individual submitting the request, or best person to contact for further details if necessary
- Contact Phone: Good call back number should support need further information or testing with someone at the hotel
- Description: describe, in detail the reason for the support ticket. Things such as date, time, telephoen number or extension, and what troubleshootings steps have been done already are useful in this field
- Submit: ticket to Think Simplicty, will be sent as an email to support@thinksimplicity.com
SimplyVX
Collection of settings to manage call flow and routing
Tel Extensions
Tel Extensions
Shows the status, permissions, and allows you to modify these settings for all extensions in the hotel
Extensions are categorized and separated by Guest Room, House Phones, and Admin Extensions
- Click View to modify an extension
- Select Add Rate Sheet to change the calling rate for an extension
View

- Name: View or Edit the current Guest name
- DND: Toggle Do Not Disturb on or off
- Status: Toggle the current occupancy status for the room
- Maid Status: Update the Maid Code Status of the room (also done via phone using *94+Status Code)
- Voicemail Email: email address that a copy of the voicemail messages will be sent to
Feature - IVR
Allows you to see, and modify the IVR (interactive voice response, a.k.a. auto-attendant) for the hotel.

- Key: The key that will be pressed to select the corresponding option (ie. Key 1 would be the same as "Press 1 for Catering"
- IVR: Select the IVR you wish to modify
- Destination: Extension or telephone number the IVR option will route to.
SimplyWake
Wake up call system
List
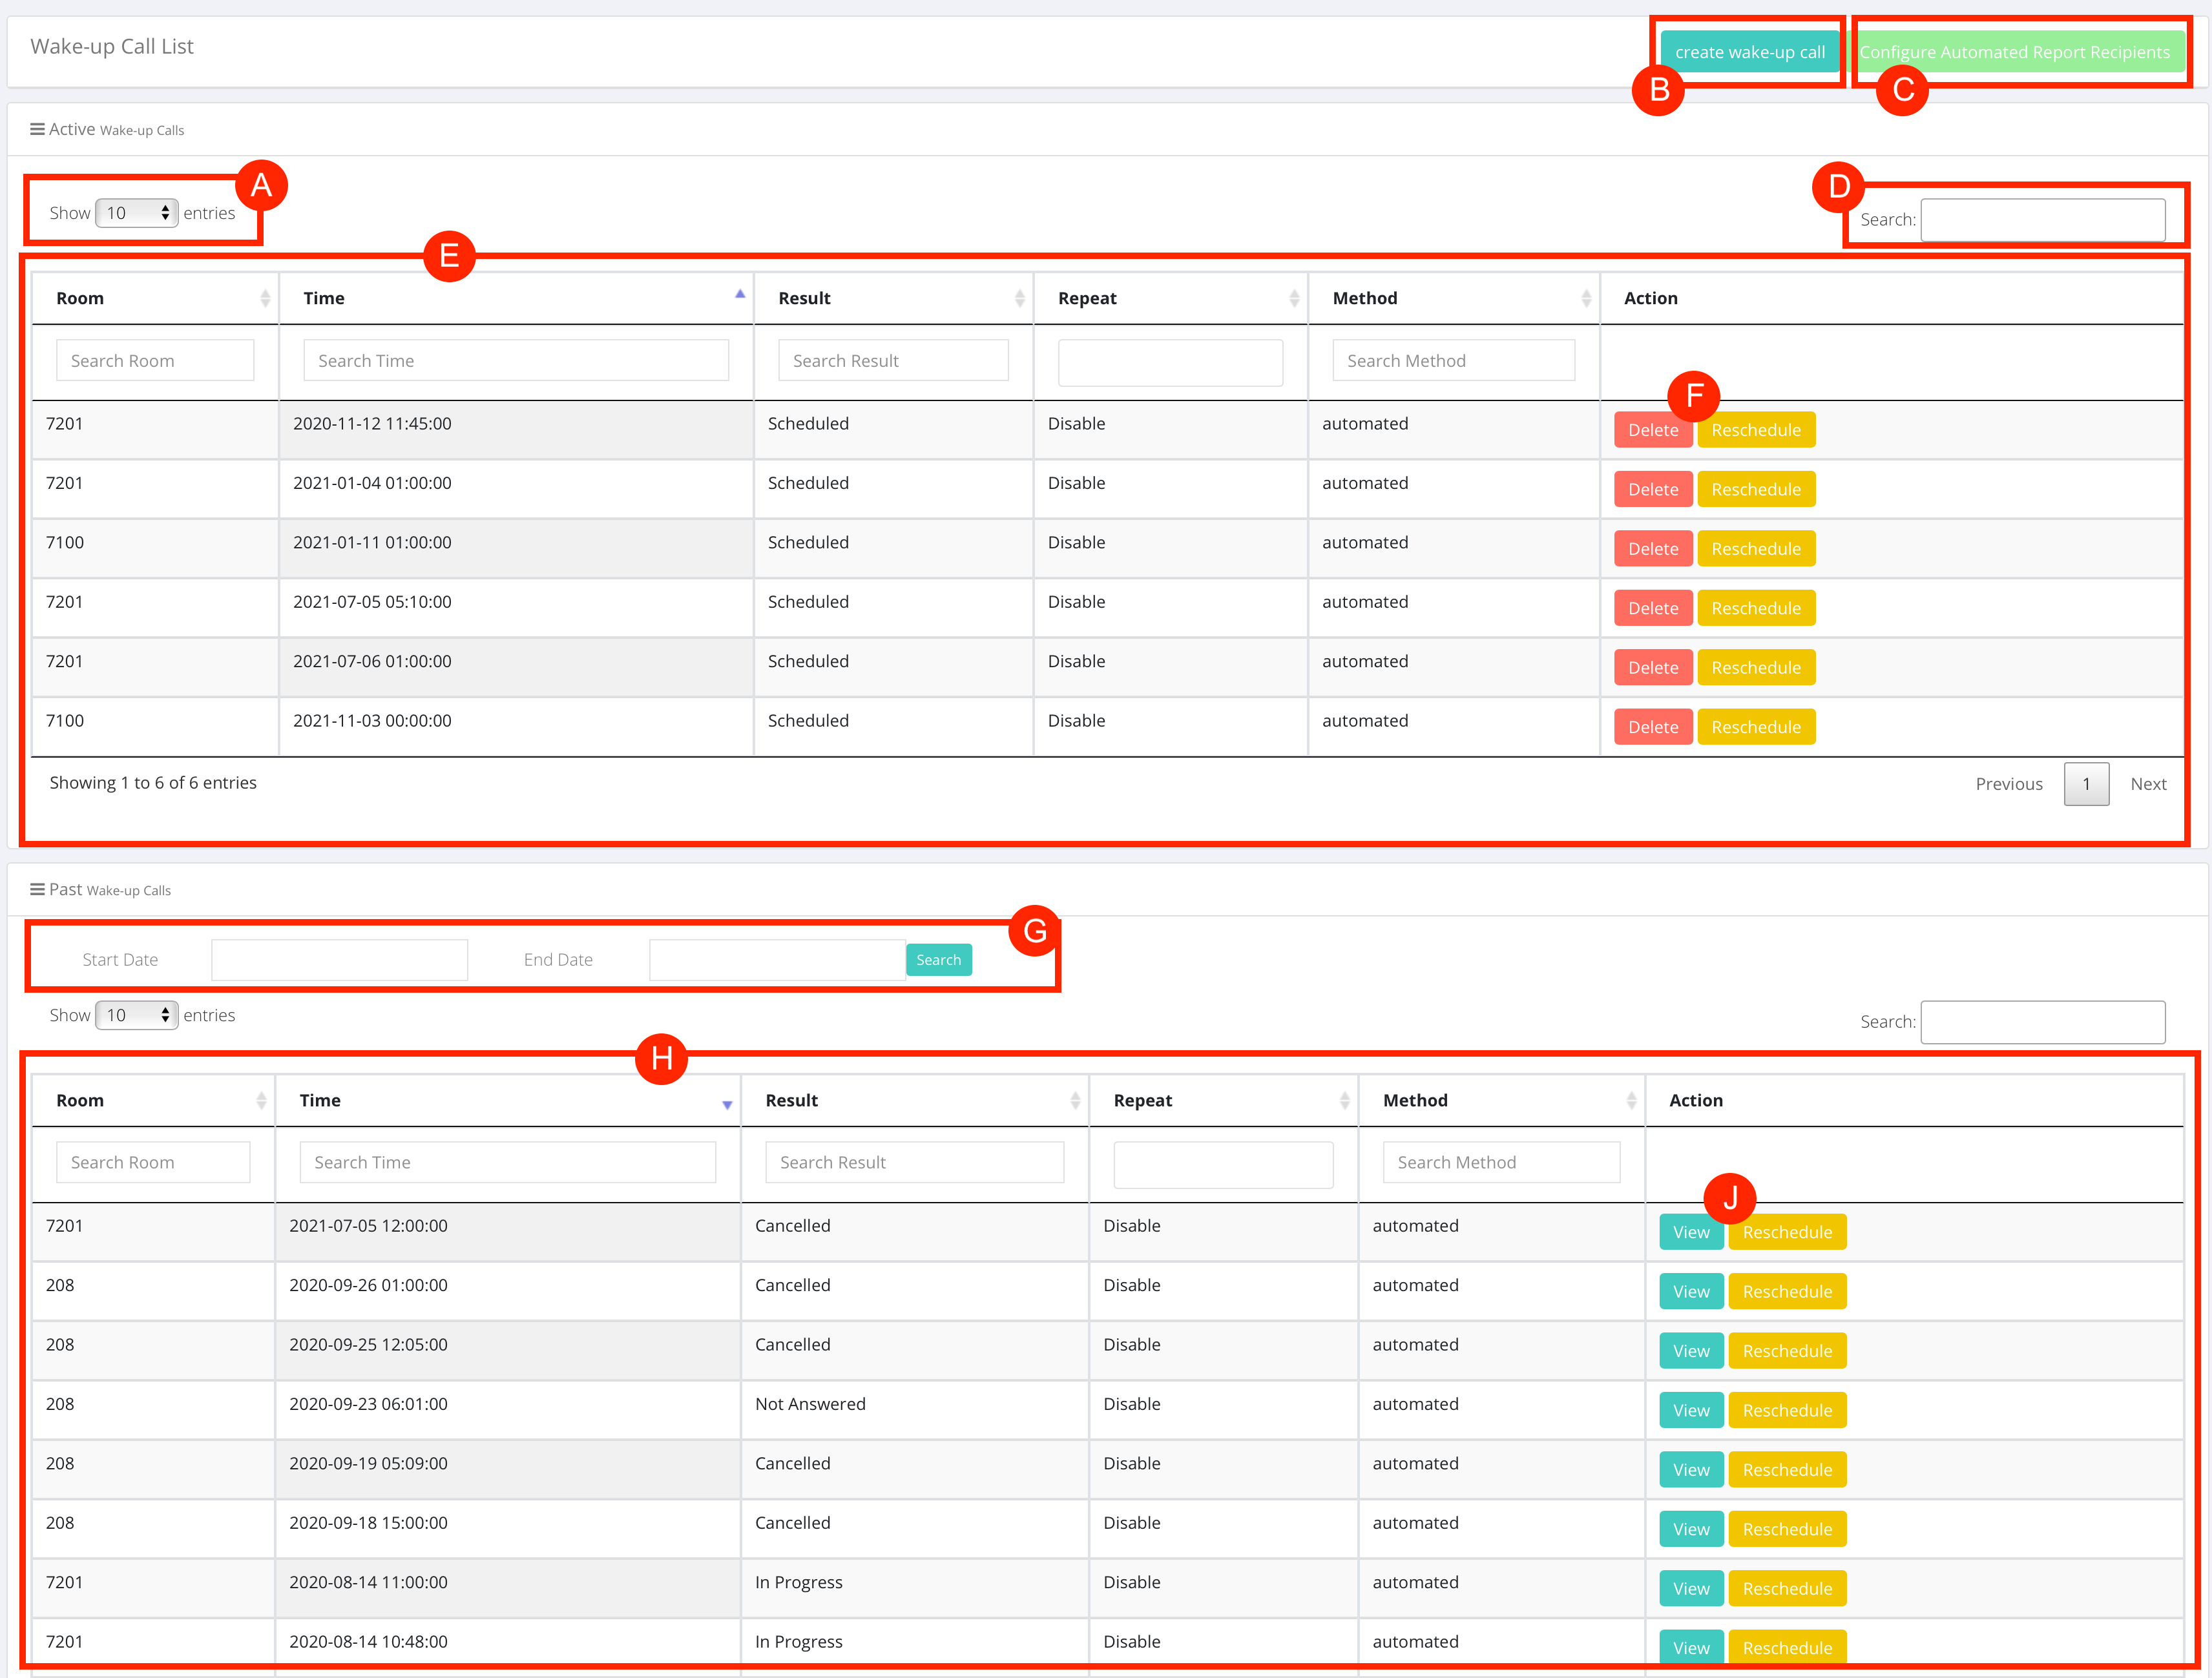
A: Row Filter Dropdown
Filter the number of rows shown in the associated table
B: Create New Wake-up Call button
More information found here: https://kb.thinksimplicity.net/link/568#bkmrk-page-title
C: Button to pop up which allows you to manage the automated wake up call report recipients

The pop up screen will show all the users associated to the site and will allow you to select which users should receive the report by clicking on the 'Set' button beside the email address.
If a user is already set to receive the wake up report, then the icon will show "Unset". When unset is clicked, the icon changes to "Set".
D: Search box will filter out the rows shown by any matching character strings entered in any field within the associated table.
E: Active Wake-up Calls table. This lists all the active wake-up calls.
-
-
- Room - Shows the room number
- Time - Shows the scheduled time for the wake-up call by year - month - day hour : minute : second
- Result - Shows the status of the wake-up call
- Repeat - Shows if the wake-up call is to be repeated
- Method - The way the wake-up call will notify the Room
- automated - the system will call the Room directly and play a pre-recorded recording when answered
- manual - the system will call the front desk extensions and notify the staff that guest in room # will need to be woken up
- Action - Actions which can be taken upon the wake-up call entry
-
F: Action - Actions which can be taken upon the wake-up call entry
-
-
- Delete - Removes the wake-up call for the Room
- Reschedule - Allows the wake-up call to be changed to another day and time
-
G: Filter records in the associated table by date range
H: Table showing a list of Past Wake-up Calls
-
-
- Room - Shows the room number
- Time - Shows the scheduled time for the wake-up call by year - month - day hour : minute : second
- Result - Shows the status of the wake-up call
- Repeat - Shows if the wake-up call is to be repeated
- Method - The way the wake-up call will notify the Room
- automated - the system will call the Room directly and play a pre-recorded recording when answered
- manual - the system will call the front desk extensions and notify the staff that guest in room # will need to be woken up
- Action - Actions which can be taken upon the wake-up call entry
-
J: Action - Actions which can be taken upon the wake-up call entry
-
-
- Reschedule - Allows the wake-up call to be changed to another day and time
- View - View an already called wake up call - view the time answered, and who last modified the wake up call
-
Viewing Past Wake-up Calls
In the image below, it represents what will be displayed when you click on the 'View' button next to the Past Wake-up Calls entry.
You will have the scheduling details listed on the left and on the right you will have the attempts listed and their results.

Create
Wake-Up Call module can be accessed by clicking "SimplyWake" on the left hand menu of links. Then select "Create"

- Select Date: Click on this field to select the date the wake-up call should be triggered
- Select Hour: Click on the corresponding box to select the hour to trigger the wake-up call
- Select the Minute: Select the minute (displayed in 5 min increments) for the wake-up call to be triggered.
- AM or PM: Choose whether the wake-up call should trigger in the AM or the PM
- Wake-up Method: Choose whether the wake-up call will be triggered using the automated system (default) or if the hotel staff will manually call.
- Repeat Wake-up Daily: Allows the same wake-up call to be scheduled for consecutive days
- Room List: Choose the room the wake-up call system will call/trigger for.